UX RESEARCH
UX RESEARCH
UX RESEARCH
UX RESEARCH
Enhancing Accessibility and Intuitiveness: VML Studio Builder
The MVP Studio Builder application is currently used internally to service customers. As we transition to an R1 release, we aim to establish a vision for the Builder that lowers the entry barrier for customers and non-technical users.
COMPANY
The Team
Jaume Gilbrat
Aynsley Longridge


Overview
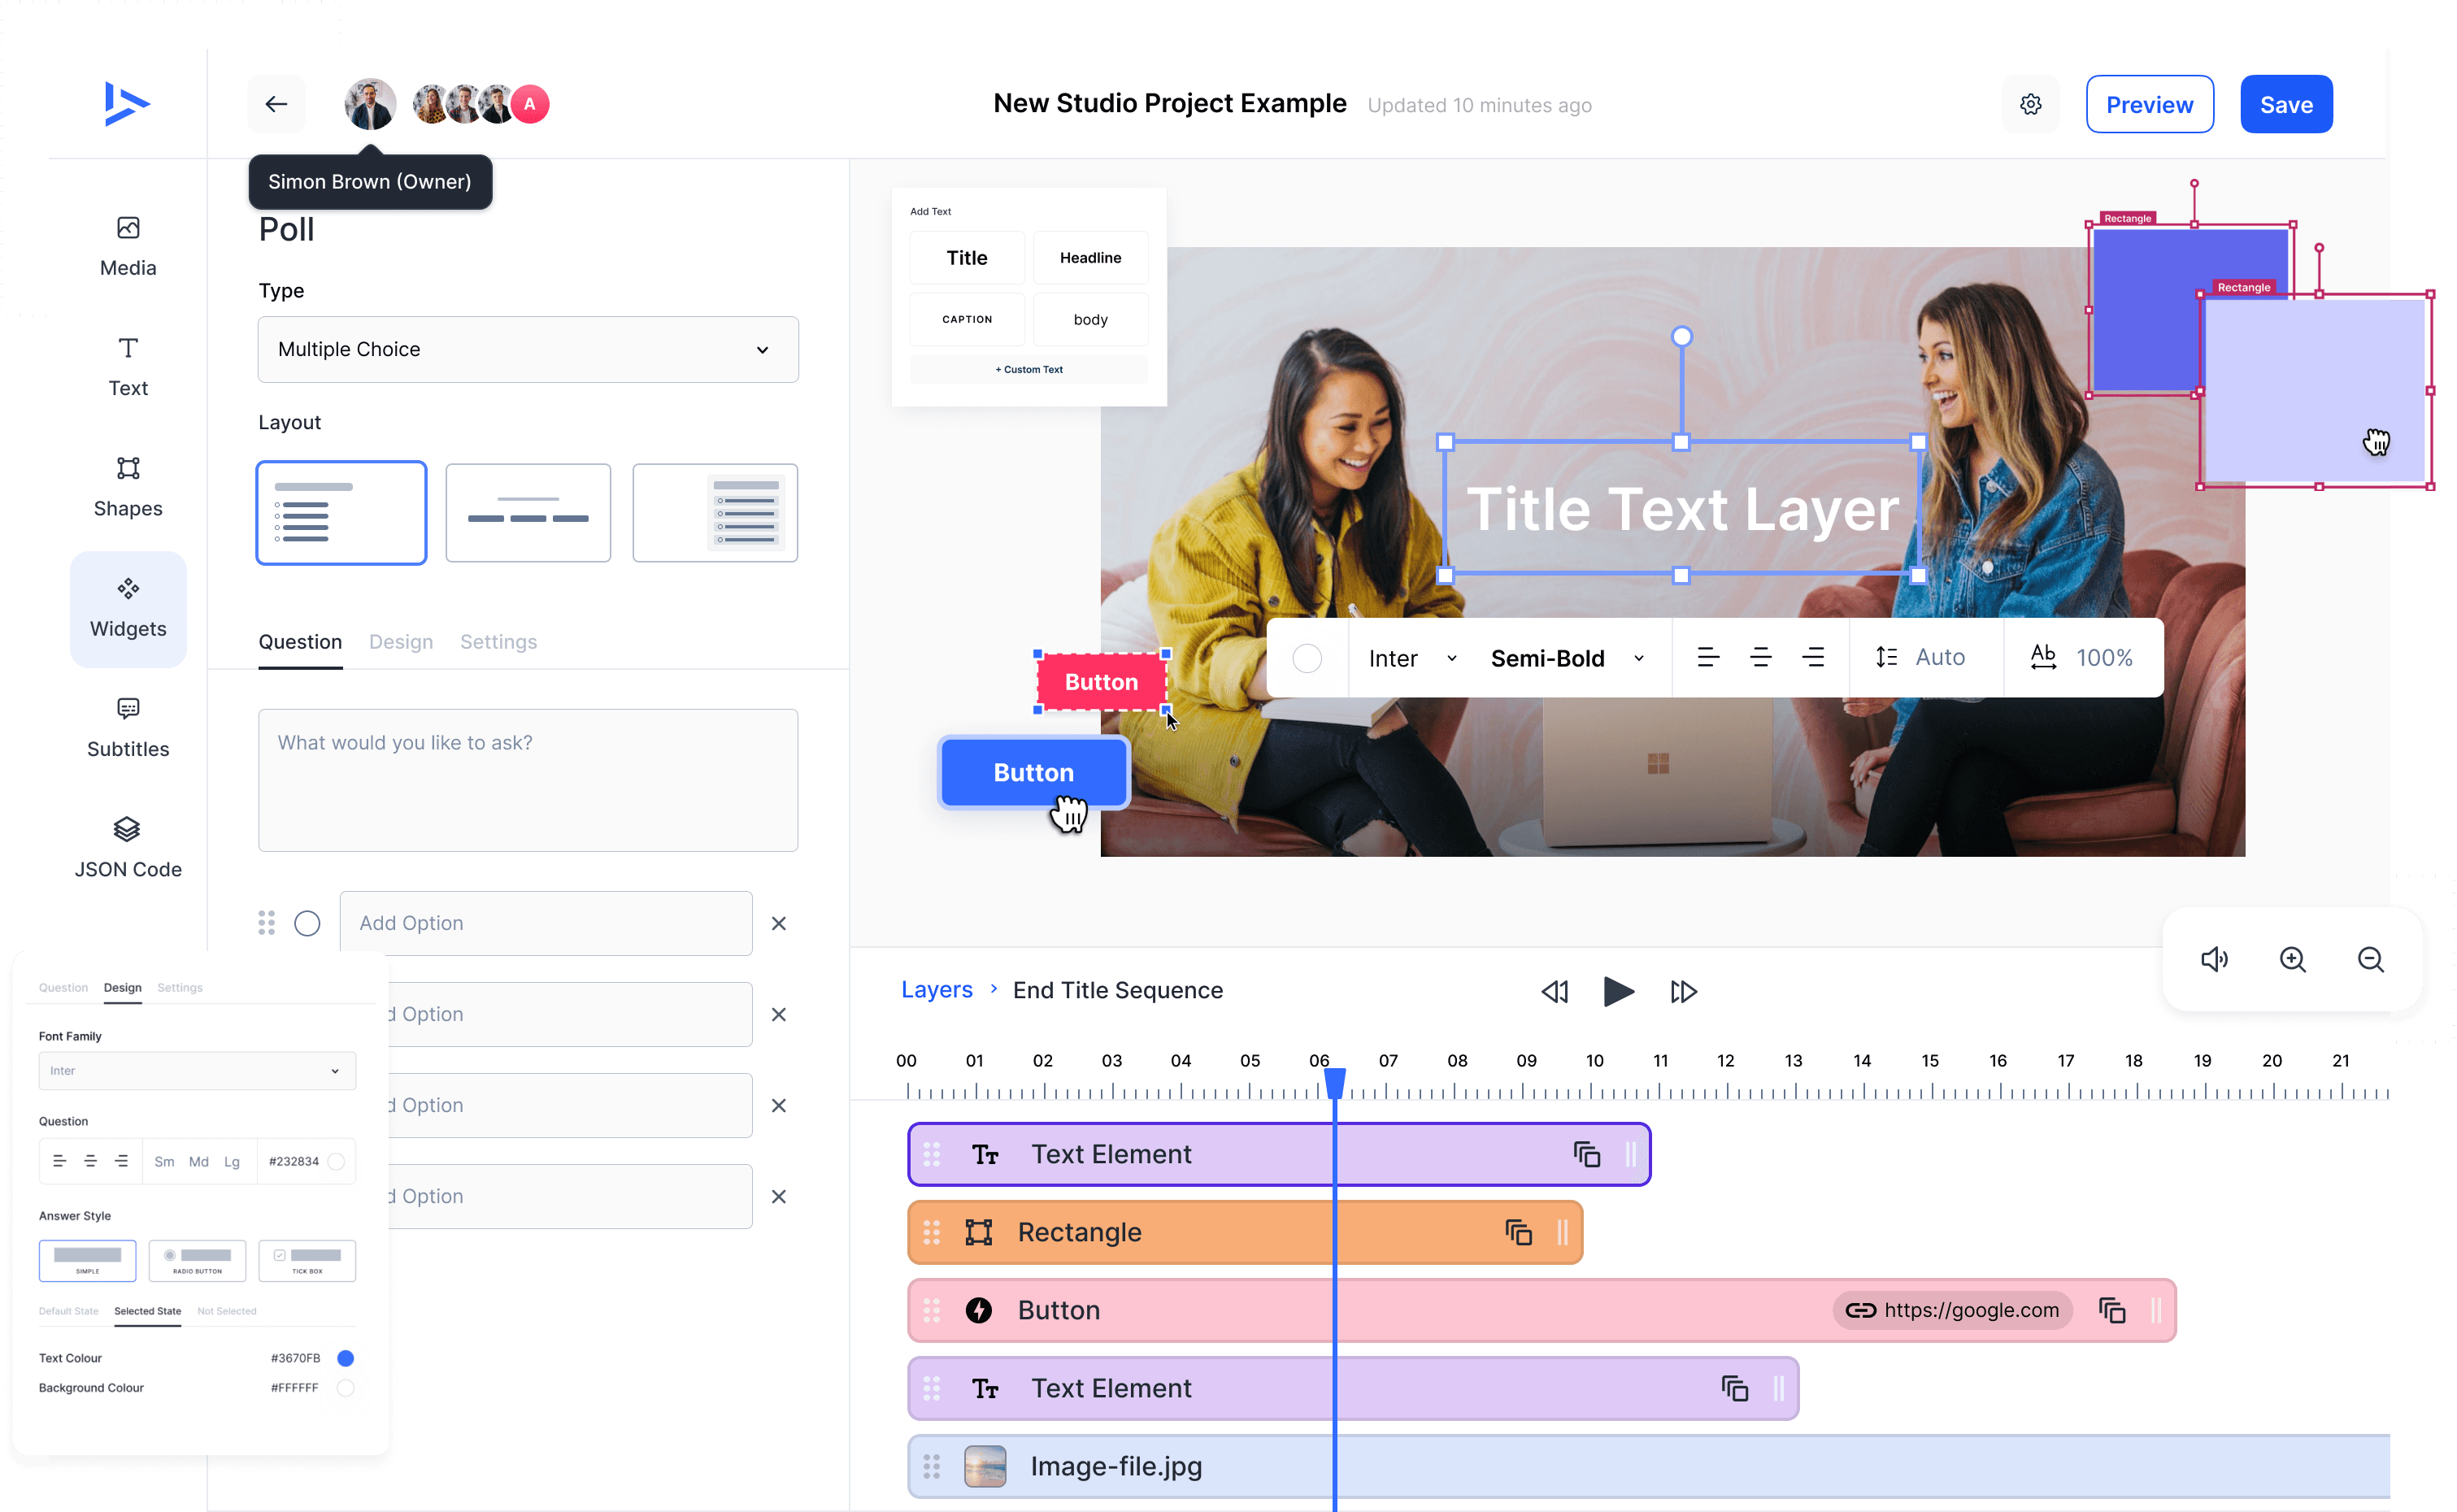
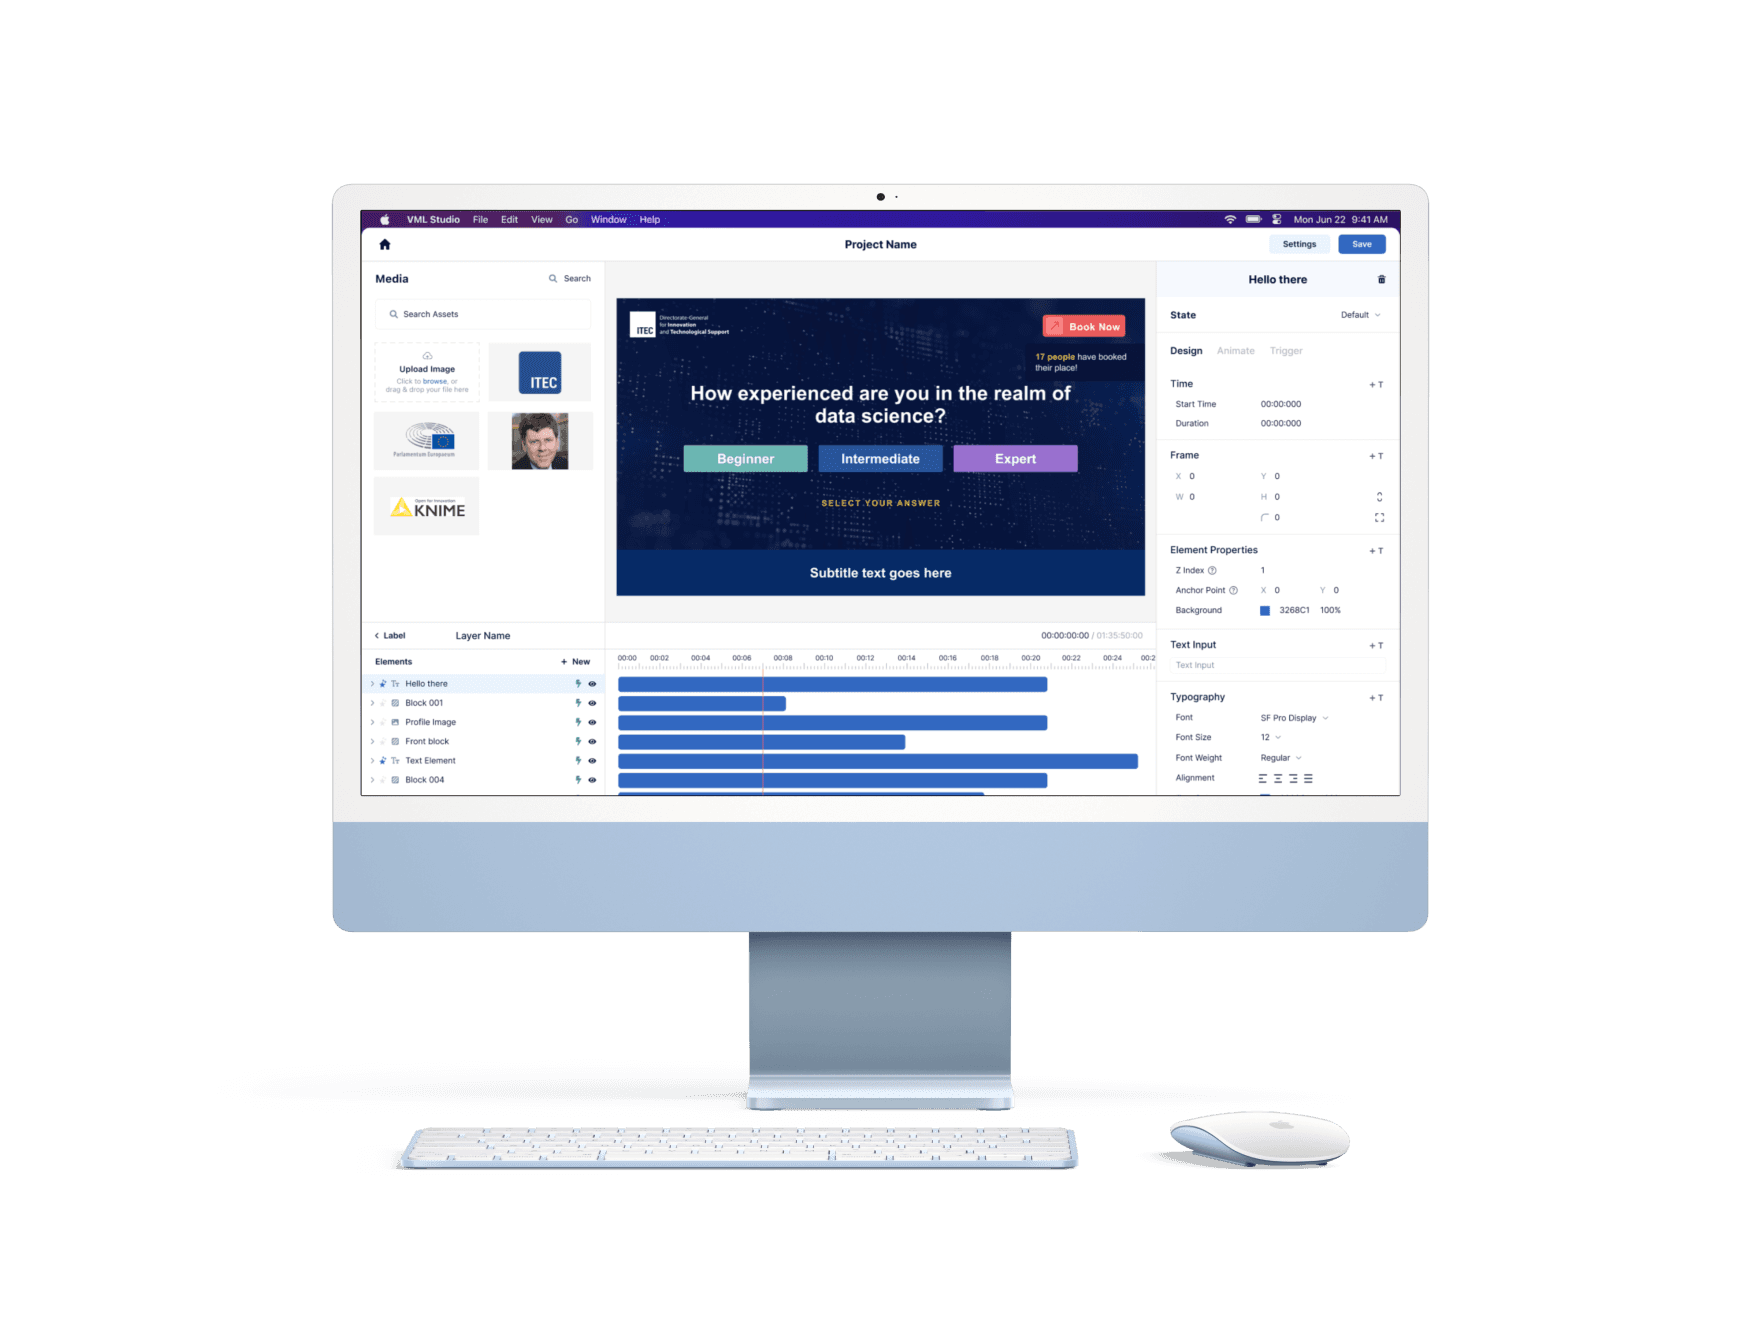
First of all, let me introduce VML Technology's MVP Studio Builder. It’s a studio that the design team uses internally to build up all the components that make our dynamic videos. This is the front-end UI for our JSON code that builds a VML video.
The builder is still in the it’s early stage of life, and in fact, it currently acts as stage 1 of our creation process of a VML video. While it provides a solid foundation for visually building the storyboard, there are a lot of features that are yet to be developed. As a designer, I will often be jumping in and out of the code editor to manually write the JSON code.
The Challenge
As we work towards an R1 release, we need to remove the mindset that the design team is the primary studio user. We want to create a product that has a simplified user experience, making it intuitive and accessible for all levels of expertise to create a VML Video. The challenge lies in redefining the builder to cater to a broader audience while still meeting the needs of advanced users who require more technical features.
My Role
My role was to collaborate closely with my colleague, Jaume, over a two-week sprint to conduct in-depth research. Our goal was to uncover pain points, identify opportunities, understand the users' needs, and finally, create a solution.
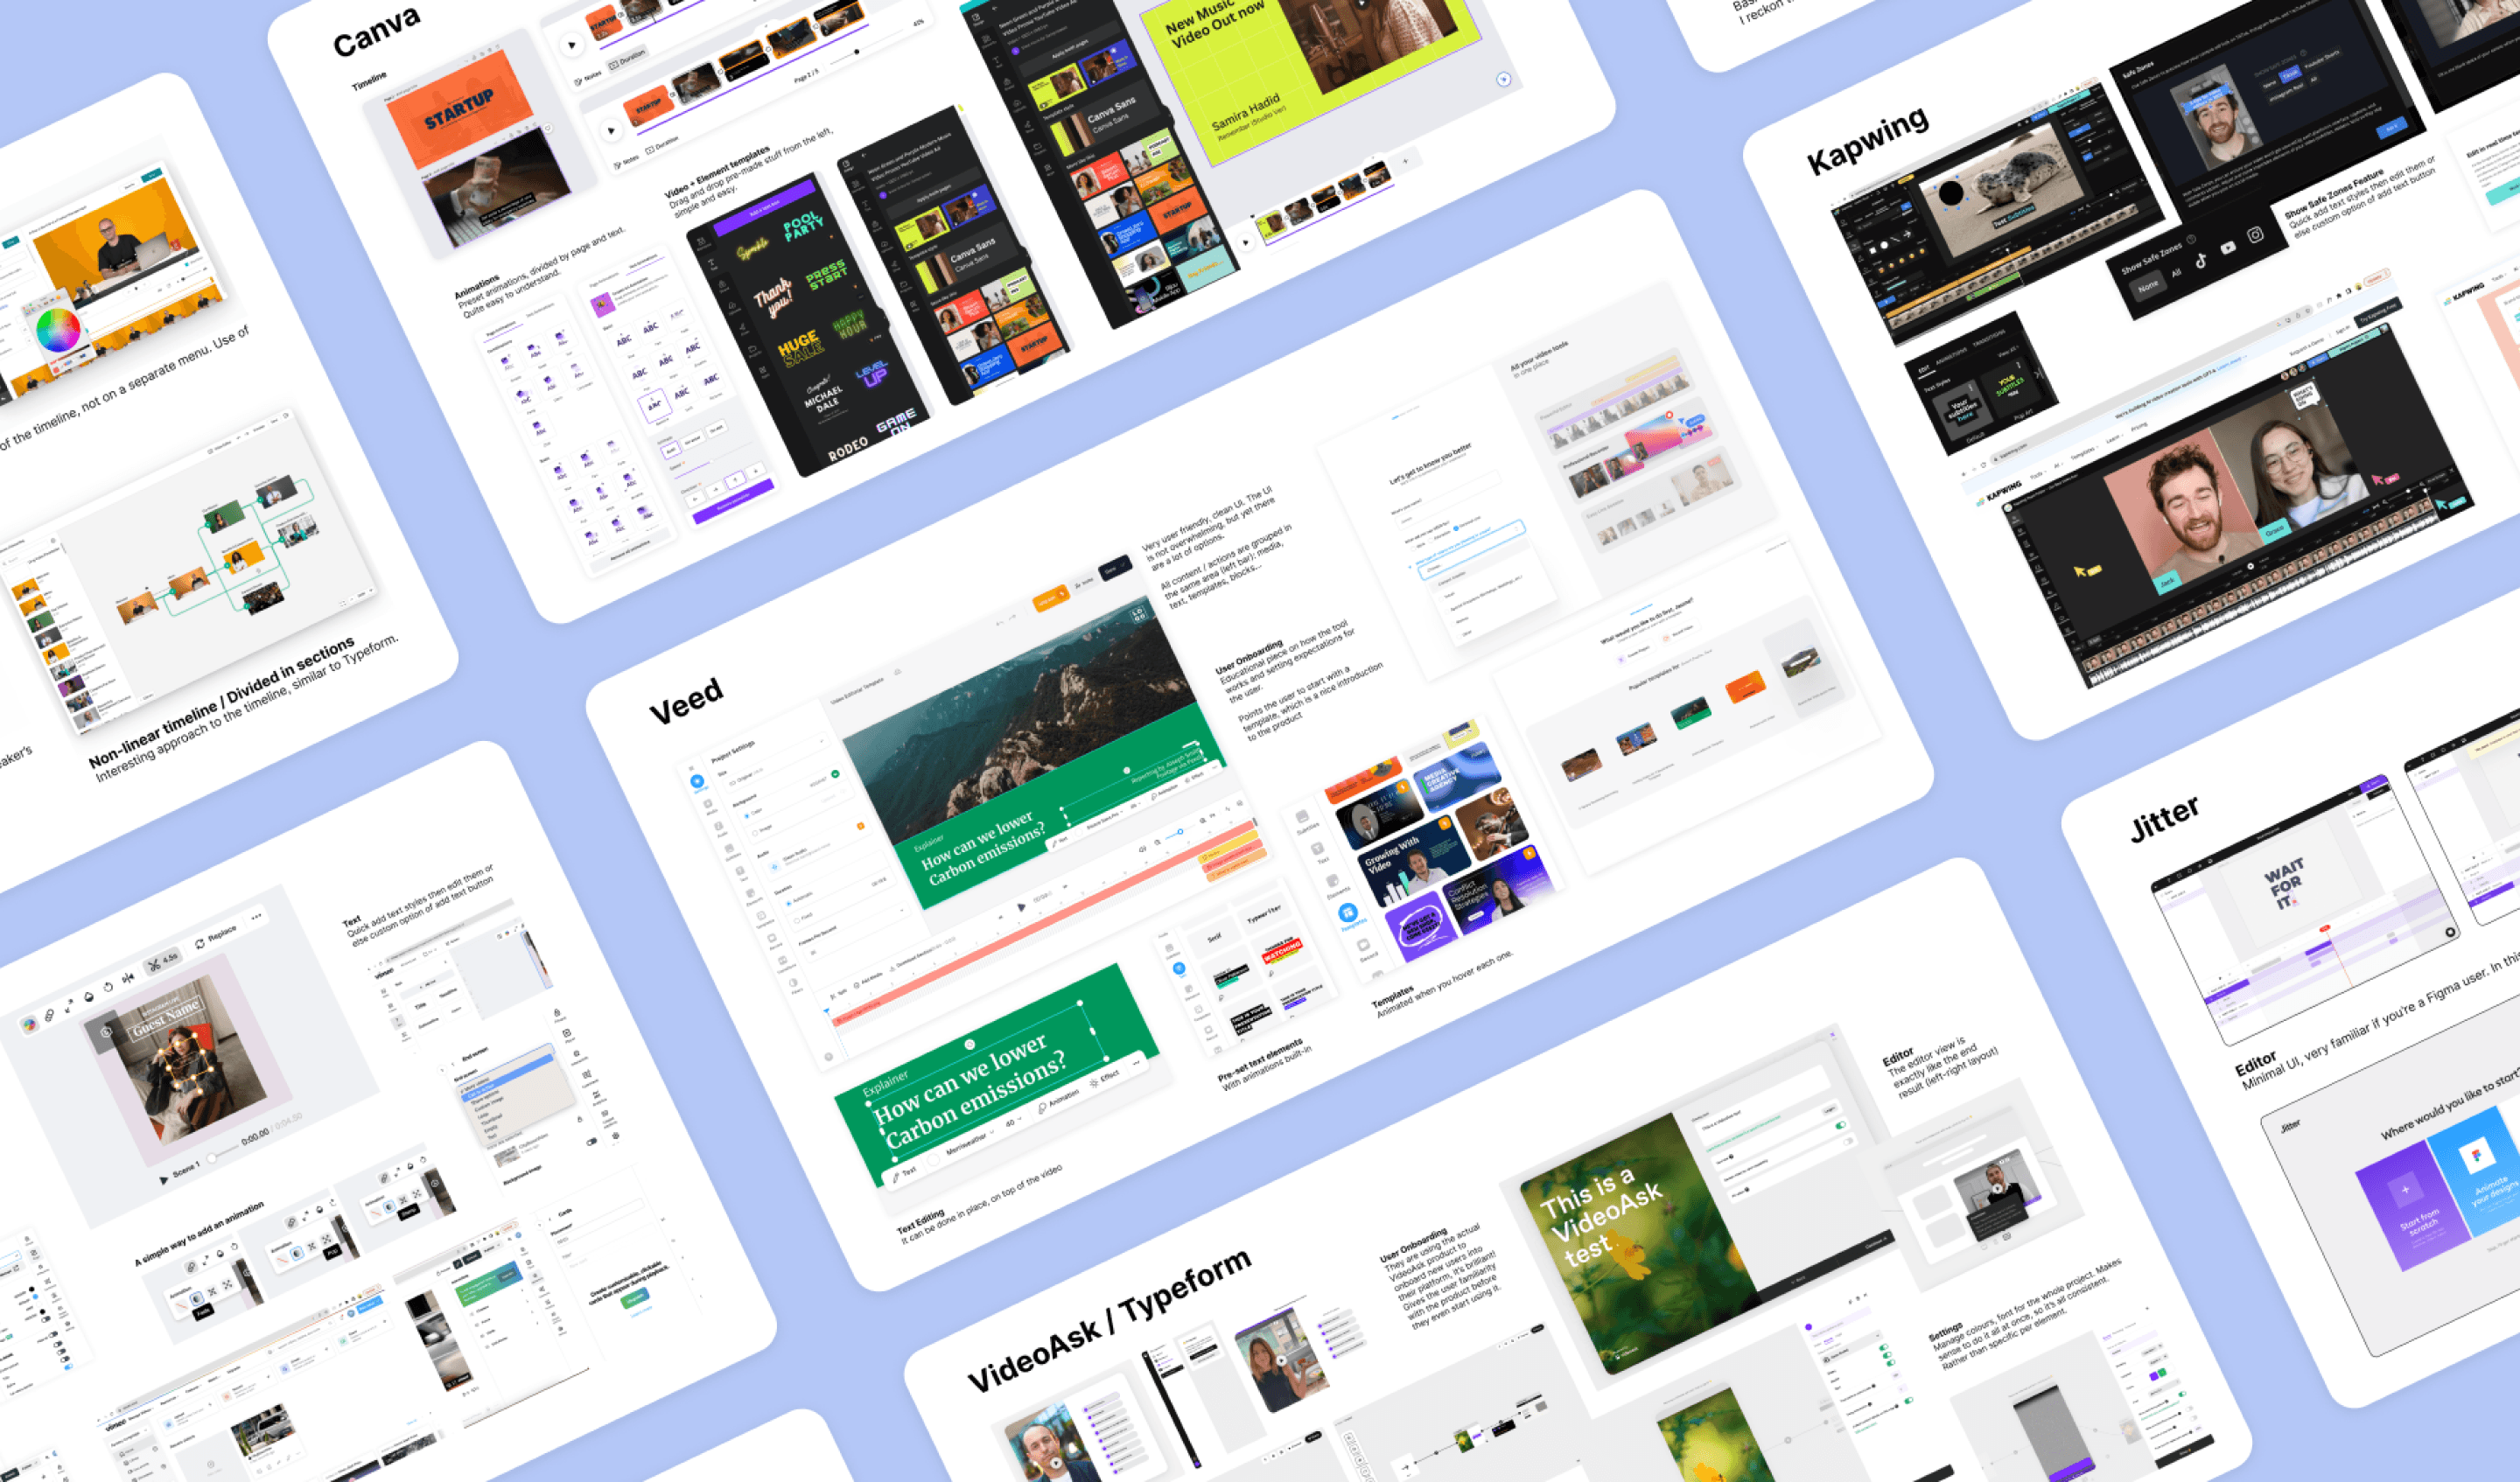
We explored various research approaches to gain a comprehensive understanding of the problem. Using our findings as a foundation, we brainstormed, sketched, and prototyped ideas. We then shared these concepts with the team for feedback, iterated based on their input, and then presented the refined concepts to higher management.


Competitor Review
Competitor Review
Competitor Review
Overview
First of all, let me introduce VML Technology's MVP Studio Builder. It’s a studio that the design team uses internally to build up all the components that make our dynamic videos. This is the front-end UI for our JSON code that builds a VML video.
The builder is still in the it’s early stage of life, and in fact, it currently acts as stage 1 of our creation process of a VML video. While it provides a solid foundation for visually building the storyboard, there are a lot of features that are yet to be developed. As a designer, I will often be jumping in and out of the code editor to manually write the JSON code.
The Challenge
As we work towards an R1 release, we need to remove the mindset that the design team is the primary studio user. We want to create a product that has a simplified user experience, making it intuitive and accessible for all levels of expertise to create a VML Video. The challenge lies in redefining the builder to cater to a broader audience while still meeting the needs of advanced users who require more technical features.
My Role
My role was to collaborate closely with my colleague, Jaume, over a two-week sprint to conduct in-depth research. Our goal was to uncover pain points, identify opportunities, understand the users' needs, and finally, create a solution.
We explored various research approaches to gain a comprehensive understanding of the problem. Using our findings as a foundation, we brainstormed, sketched, and prototyped ideas. We then shared these concepts with the team for feedback, iterated based on their input, and then presented the refined concepts to higher management.

Competitor Review
Understand
The understanding phase was crucial to this piece. Since Jaume and I were experienced studio users, we spent a lot of time defining who our users were and discovering what they needed instead of what we needed. We used a variety of different research methods and used those findings to make informed design decisions going forward.
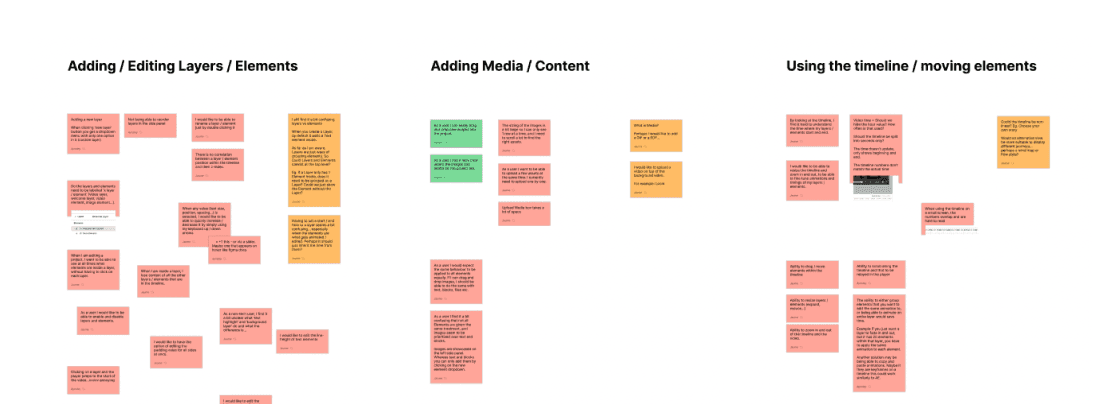
No onboarding / tips / help when a user creates a project for the first time.
No onboarding / tips / help when a user creates a project for the first time.
No onboarding / tips / help when a user creates a project for the first time.
No onboarding / tips / help when a user creates a project for the first time.
I would like to be able to resize the timeline and zoom in and out, to be able to fine tune animations and timings of my layers / elements.
I would like to be able to resize the timeline and zoom in and out, to be able to fine tune animations and timings of my layers / elements.
As a user I want to be able to upload a few assets at the same time. I currently need to upload one by one.
As a user I want to be able to upload a few assets at the same time. I currently need to upload one by one.
As a user I want to be able to upload a few assets at the same time. I currently need to upload one by one.
As a user I want to be able to upload a few assets at the same time. I currently need to upload one by one.


As a user I would like to easily drag and drop new images into the project.
As a user I would like to easily drag and drop new images into the project.
As a user I would like to easily drag and drop new images into the project.
As a user I would like to easily drag and drop new images into the project.
As a user I would like to see the the safe area of my canvas, and what content might end up behind the player controls...
As a user I would like to see the the safe area of my canvas, and what content might end up behind the player controls...
As a user I am concerned that while I’m working on a project, my colleague is editing it at the same time, and both our changes won’t get properly saved.
As a user I am concerned that while I’m working on a project, my colleague is editing it at the same time, and both our changes won’t get properly saved.
As a user I am concerned that while I’m working on a project, my colleague is editing it at the same time, and both our changes won’t get properly saved.
As a user I am concerned that while I’m working on a project, my colleague is editing it at the same time, and both our changes won’t get properly saved.
MVP Studio Empathy Building
Methods we used:
Empathy Building
We immersed ourselves in the user's shoes to understand pain points and frustrations.
01
User Personas
Developed personas representing various user demographics and their unique needs.
02
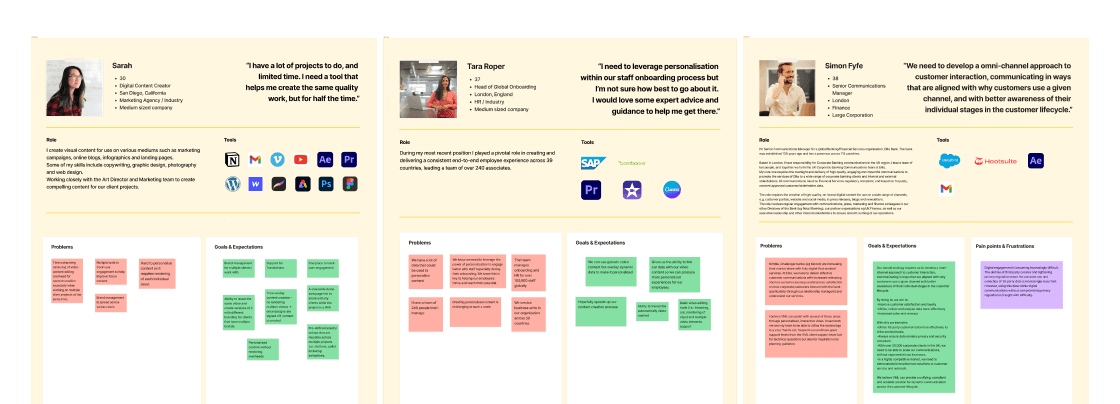
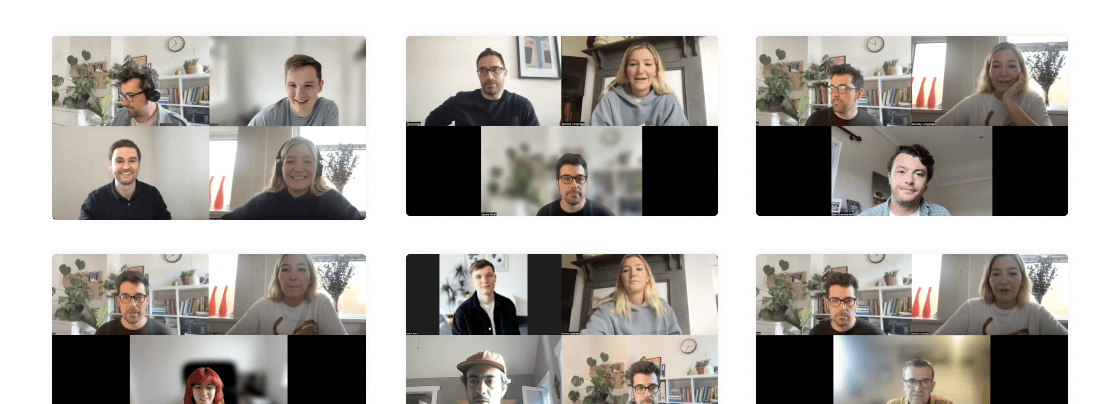
User Interviews
Conducted interviews to gain insights into user behaviours, preferences, and pain points.
03
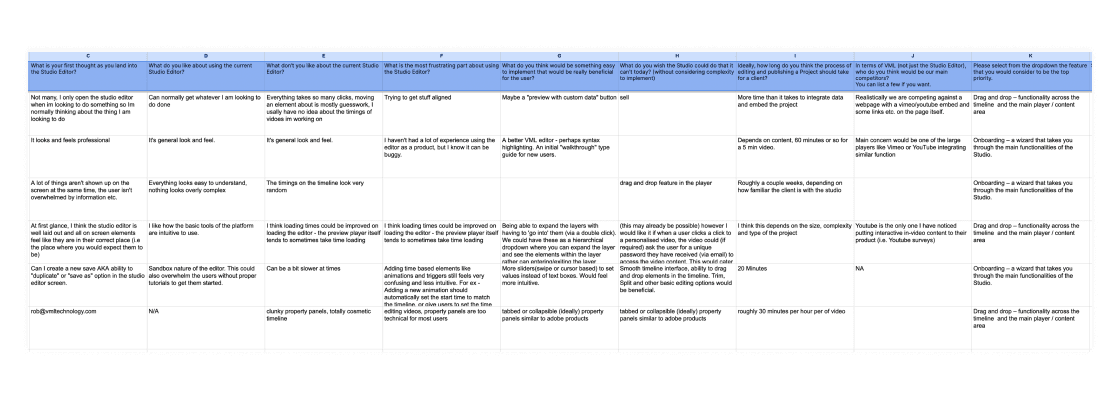
Developer Surveys
Gathered feedback from internal developers to understand technical requirements and constraints.
04
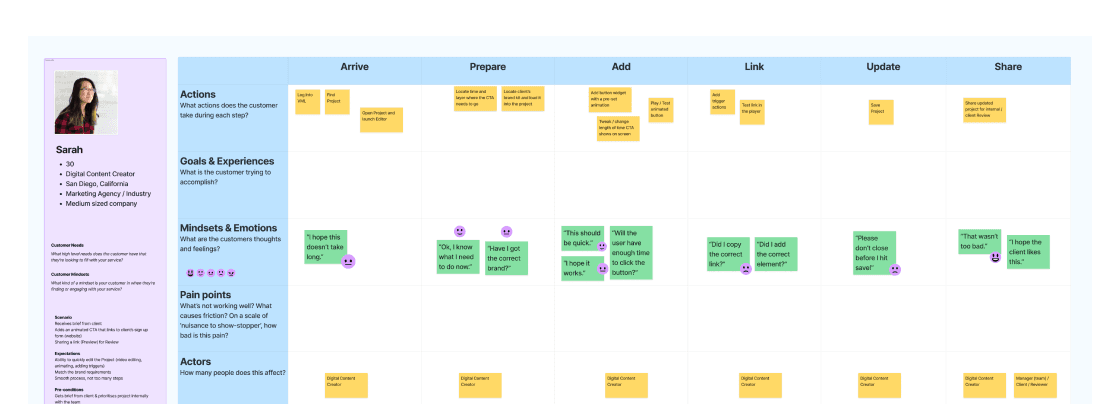
User Journey Map
Visualised the user's experience from initial interaction to project completion to identify pain points and opportunities for improvement.
05
Empathy Building
We immersed ourselves in the user's shoes to understand pain points and frustrations.
01

User Personas
Developed personas representing various user demographics and their unique needs.
02

User Interviews
Conducted interviews to gain insights into user behaviours, preferences, and pain points.
03

Developer Surveys
Gathered feedback from internal developers to understand technical requirements and constraints.
04

User Journey Map
Visualised the user's experience from initial interaction to project completion to identify pain points and opportunities for improvement.
05

Empathy Building
We immersed ourselves in the user's shoes to understand pain points and frustrations.
01

User Personas
Developed personas representing various user demographics and their unique needs.
02

User Interviews
Conducted interviews to gain insights into user behaviours, preferences, and pain points.
03

Developer Surveys
Gathered feedback from internal developers to understand technical requirements and constraints.
04

User Journey Map
Visualised the user's experience from initial interaction to project completion to identify pain points and opportunities for improvement.
05

Empathy Building
We immersed ourselves in the user's shoes to understand pain points and frustrations.
01

User Personas
Developed personas representing various user demographics and their unique needs.
02

User Interviews
Conducted interviews to gain insights into user behaviours, preferences, and pain points.
03

Developer Surveys
Gathered feedback from internal developers to understand technical requirements and constraints.
04

User Journey Map
Visualised the user's experience from initial interaction to project completion to identify pain points and opportunities for improvement.
05

Methods we used:
Empathy Building
We immersed ourselves in the user's shoes to understand pain points and frustrations.
01

User Personas
Developed personas representing various user demographics and their unique needs.
02

User Interviews
Conducted interviews to gain insights into user behaviours, preferences, and pain points.
03

Developer Surveys
Gathered feedback from internal developers to understand technical requirements and constraints.
04

User Journey Map
Visualised the user's experience from initial interaction to project completion to identify pain points and opportunities for improvement.
05

Empathy Building
We immersed ourselves in the user's shoes to understand pain points and frustrations.
01

User Personas
Developed personas representing various user demographics and their unique needs.
02

User Interviews
Conducted interviews to gain insights into user behaviours, preferences, and pain points.
03

Developer Surveys
Gathered feedback from internal developers to understand technical requirements and constraints.
04

User Journey Map
Visualised the user's experience from initial interaction to project completion to identify pain points and opportunities for improvement.
05

Empathy Building
We immersed ourselves in the user's shoes to understand pain points and frustrations.
01

User Personas
Developed personas representing various user demographics and their unique needs.
02

User Interviews
Conducted interviews to gain insights into user behaviours, preferences, and pain points.
03

Developer Surveys
Gathered feedback from internal developers to understand technical requirements and constraints.
04

User Journey Map
Visualised the user's experience from initial interaction to project completion to identify pain points and opportunities for improvement.
05

Empathy Building
We immersed ourselves in the user's shoes to understand pain points and frustrations.
01

User Personas
Developed personas representing various user demographics and their unique needs.
02

User Interviews
Conducted interviews to gain insights into user behaviours, preferences, and pain points.
03

Developer Surveys
Gathered feedback from internal developers to understand technical requirements and constraints.
04

User Journey Map
Visualised the user's experience from initial interaction to project completion to identify pain points and opportunities for improvement.
05

Methods we used:
Empathy Building
We immersed ourselves in the user's shoes to understand pain points and frustrations.
01

User Personas
Developed personas representing various user demographics and their unique needs.
02

User Interviews
Conducted interviews to gain insights into user behaviours, preferences, and pain points.
03

Developer Surveys
Gathered feedback from internal developers to understand technical requirements and constraints.
04

User Journey Map
Visualised the user's experience from initial interaction to project completion to identify pain points and opportunities for improvement.
05

Methods we used:
Empathy Building
We immersed ourselves in the user's shoes to understand pain points and frustrations.
01

User Personas
Developed personas representing various user demographics and their unique needs.
02

User Interviews
Conducted interviews to gain insights into user behaviours, preferences, and pain points.
03

Developer Surveys
Gathered feedback from internal developers to understand technical requirements and constraints.
04

User Journey Map
Visualised the user's experience from initial interaction to project completion to identify pain points and opportunities for improvement.
05

The user interview stages were particularly beneficial. We spent 30 minutes with 7 different participants. During this time we asked a mix of open-ended questions that got the participants talking and sharing their experiences with the studio. It was the final section that enlightened us the most. We gave the interviewee’s a task to complete and walk us through their steps to completion.
“I feel pretty lost when I land here, where do I start?”
What we found as each participant shared their screen and began to complete the task, the was a profound result of everyone not knowing where exactly to begin. The current studio only allows a user to add 3 simple elements: Text, Shape & Image. It is then up to the user to build and create buttons/polls etc from these building blocks. It is clear we need to have more intuitive ‘quick add’ options that are pre-made and can be customisable.
This is just an example of one thing that came out of the research stages, some other things that we will touch on during the define period included terminology, overall layout, video templates and brand kits.
Global
Global
Global
Terminology
Content structure
Layout
Global
Terminology
Content structure
Layout
Functionality
Functionality
Functionality
Drag & drop
Editing panels
Timeline & Sections
Share & Preview
Data / Tokens
Functionality
Drag & drop
Editing panels
Timeline & Sections
Share & Preview
Data / Tokens
Quick Add
Quick Add
Quick Add
Quick Add
Components & Widgets
Animations
Triggers
Text
Shapes
Templates
Templates
Templates
Type & industry
Template settings
Brand kit
Templates
Type & industry
Template settings
Brand kit
Areas to be explored from the understanding stage
Define
During the defining stage, our primary focus was to apply the insights gathered and initiate the process of finding solutions. We kicked off with a brainstorming session, jotting down ideas on post-it notes and clustering them to identify common themes.
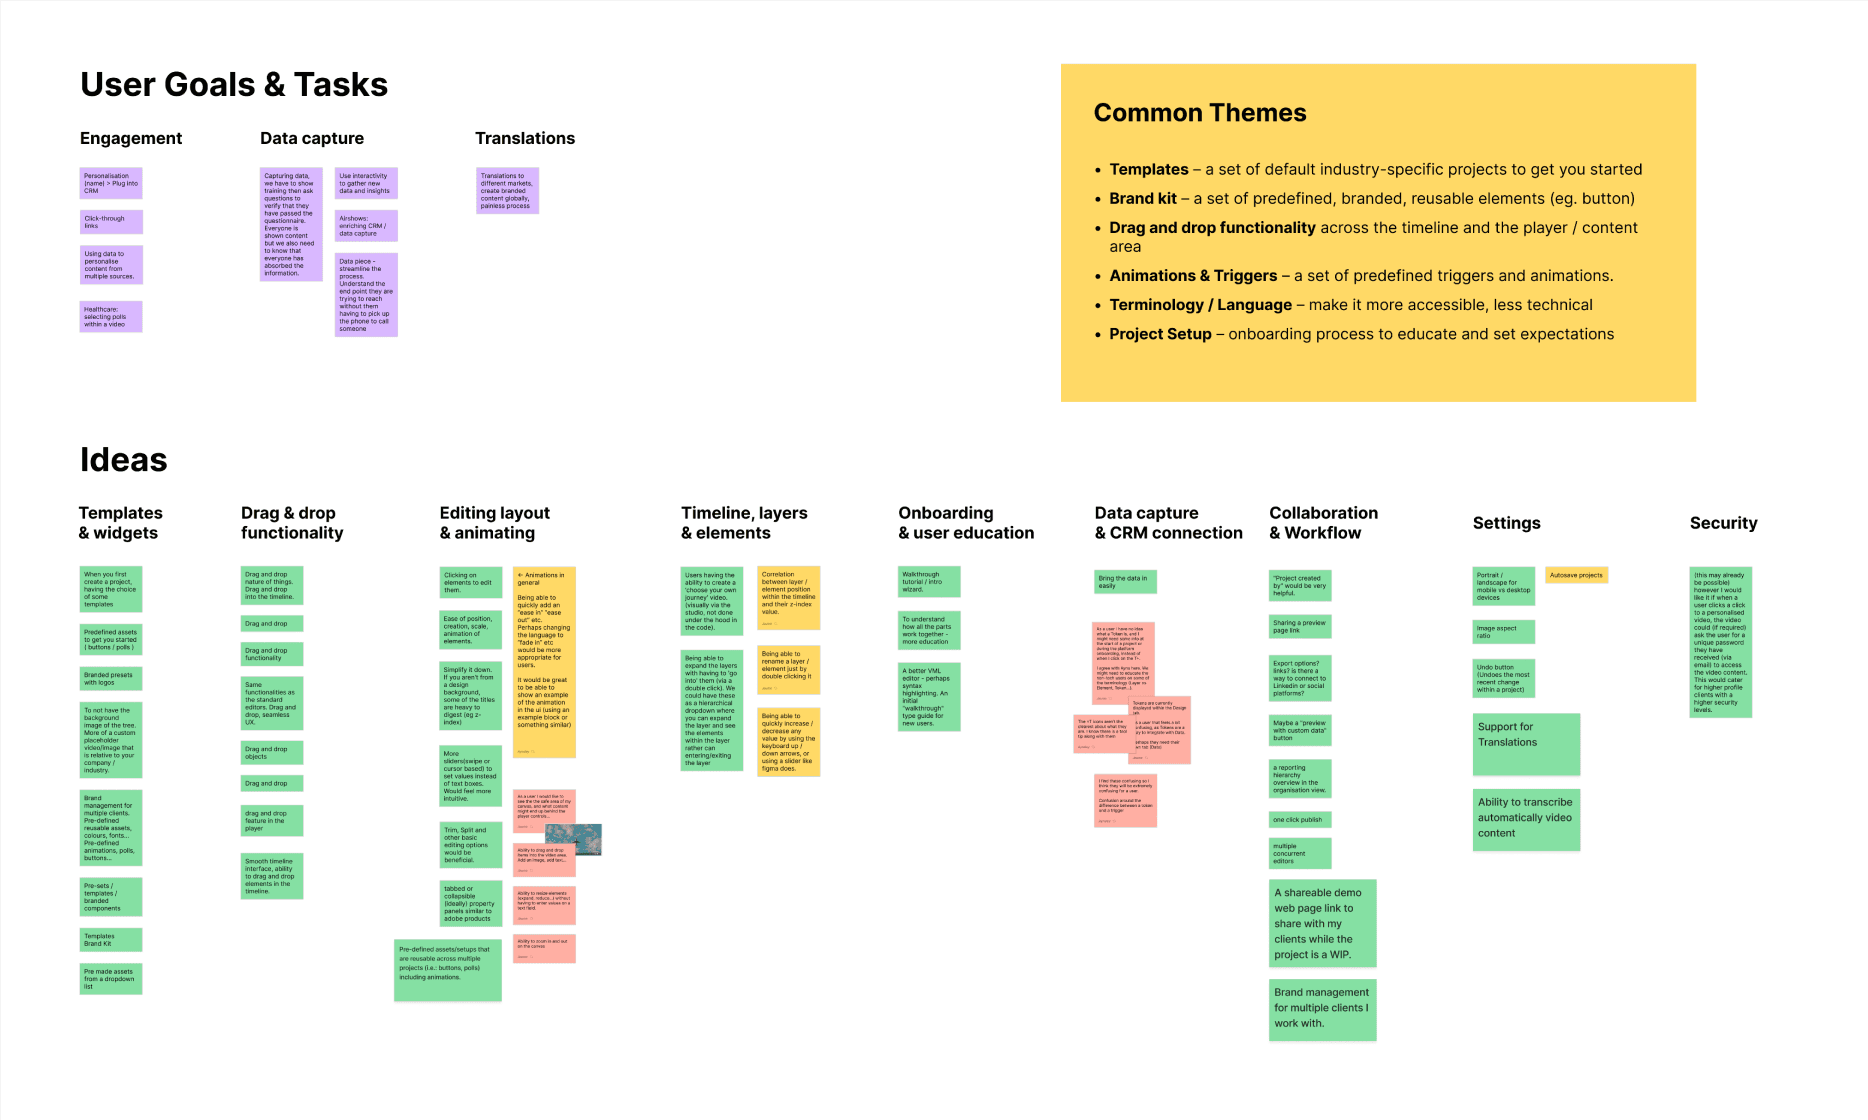
Moving on to the conceptualisation phase, we organised our ideas into separate art boards and collaboratively fleshed them out with sketches, wireframes, and graphics.
Define
During the defining stage, our primary focus was to apply the insights gathered and initiate the process of finding solutions. We kicked off with a brainstorming session, jotting down ideas on post-it notes and clustering them to identify common themes.

Moving on to the conceptualisation phase, we organised our ideas into separate art boards and collaboratively fleshed them out with sketches, wireframes, and graphics.
Define
During the defining stage, our primary focus was to apply the insights gathered and initiate the process of finding solutions. We kicked off with a brainstorming session, jotting down ideas on post-it notes and clustering them to identify common themes.

Moving on to the conceptualisation phase, we organised our ideas into separate art boards and collaboratively fleshed them out with sketches, wireframes, and graphics.
Define
During the defining stage, our primary focus was to apply the insights gathered and initiate the process of finding solutions. We kicked off with a brainstorming session, jotting down ideas on post-it notes and clustering them to identify common themes.

Moving on to the conceptualisation phase, we organised our ideas into separate art boards and collaboratively fleshed them out with sketches, wireframes, and graphics.
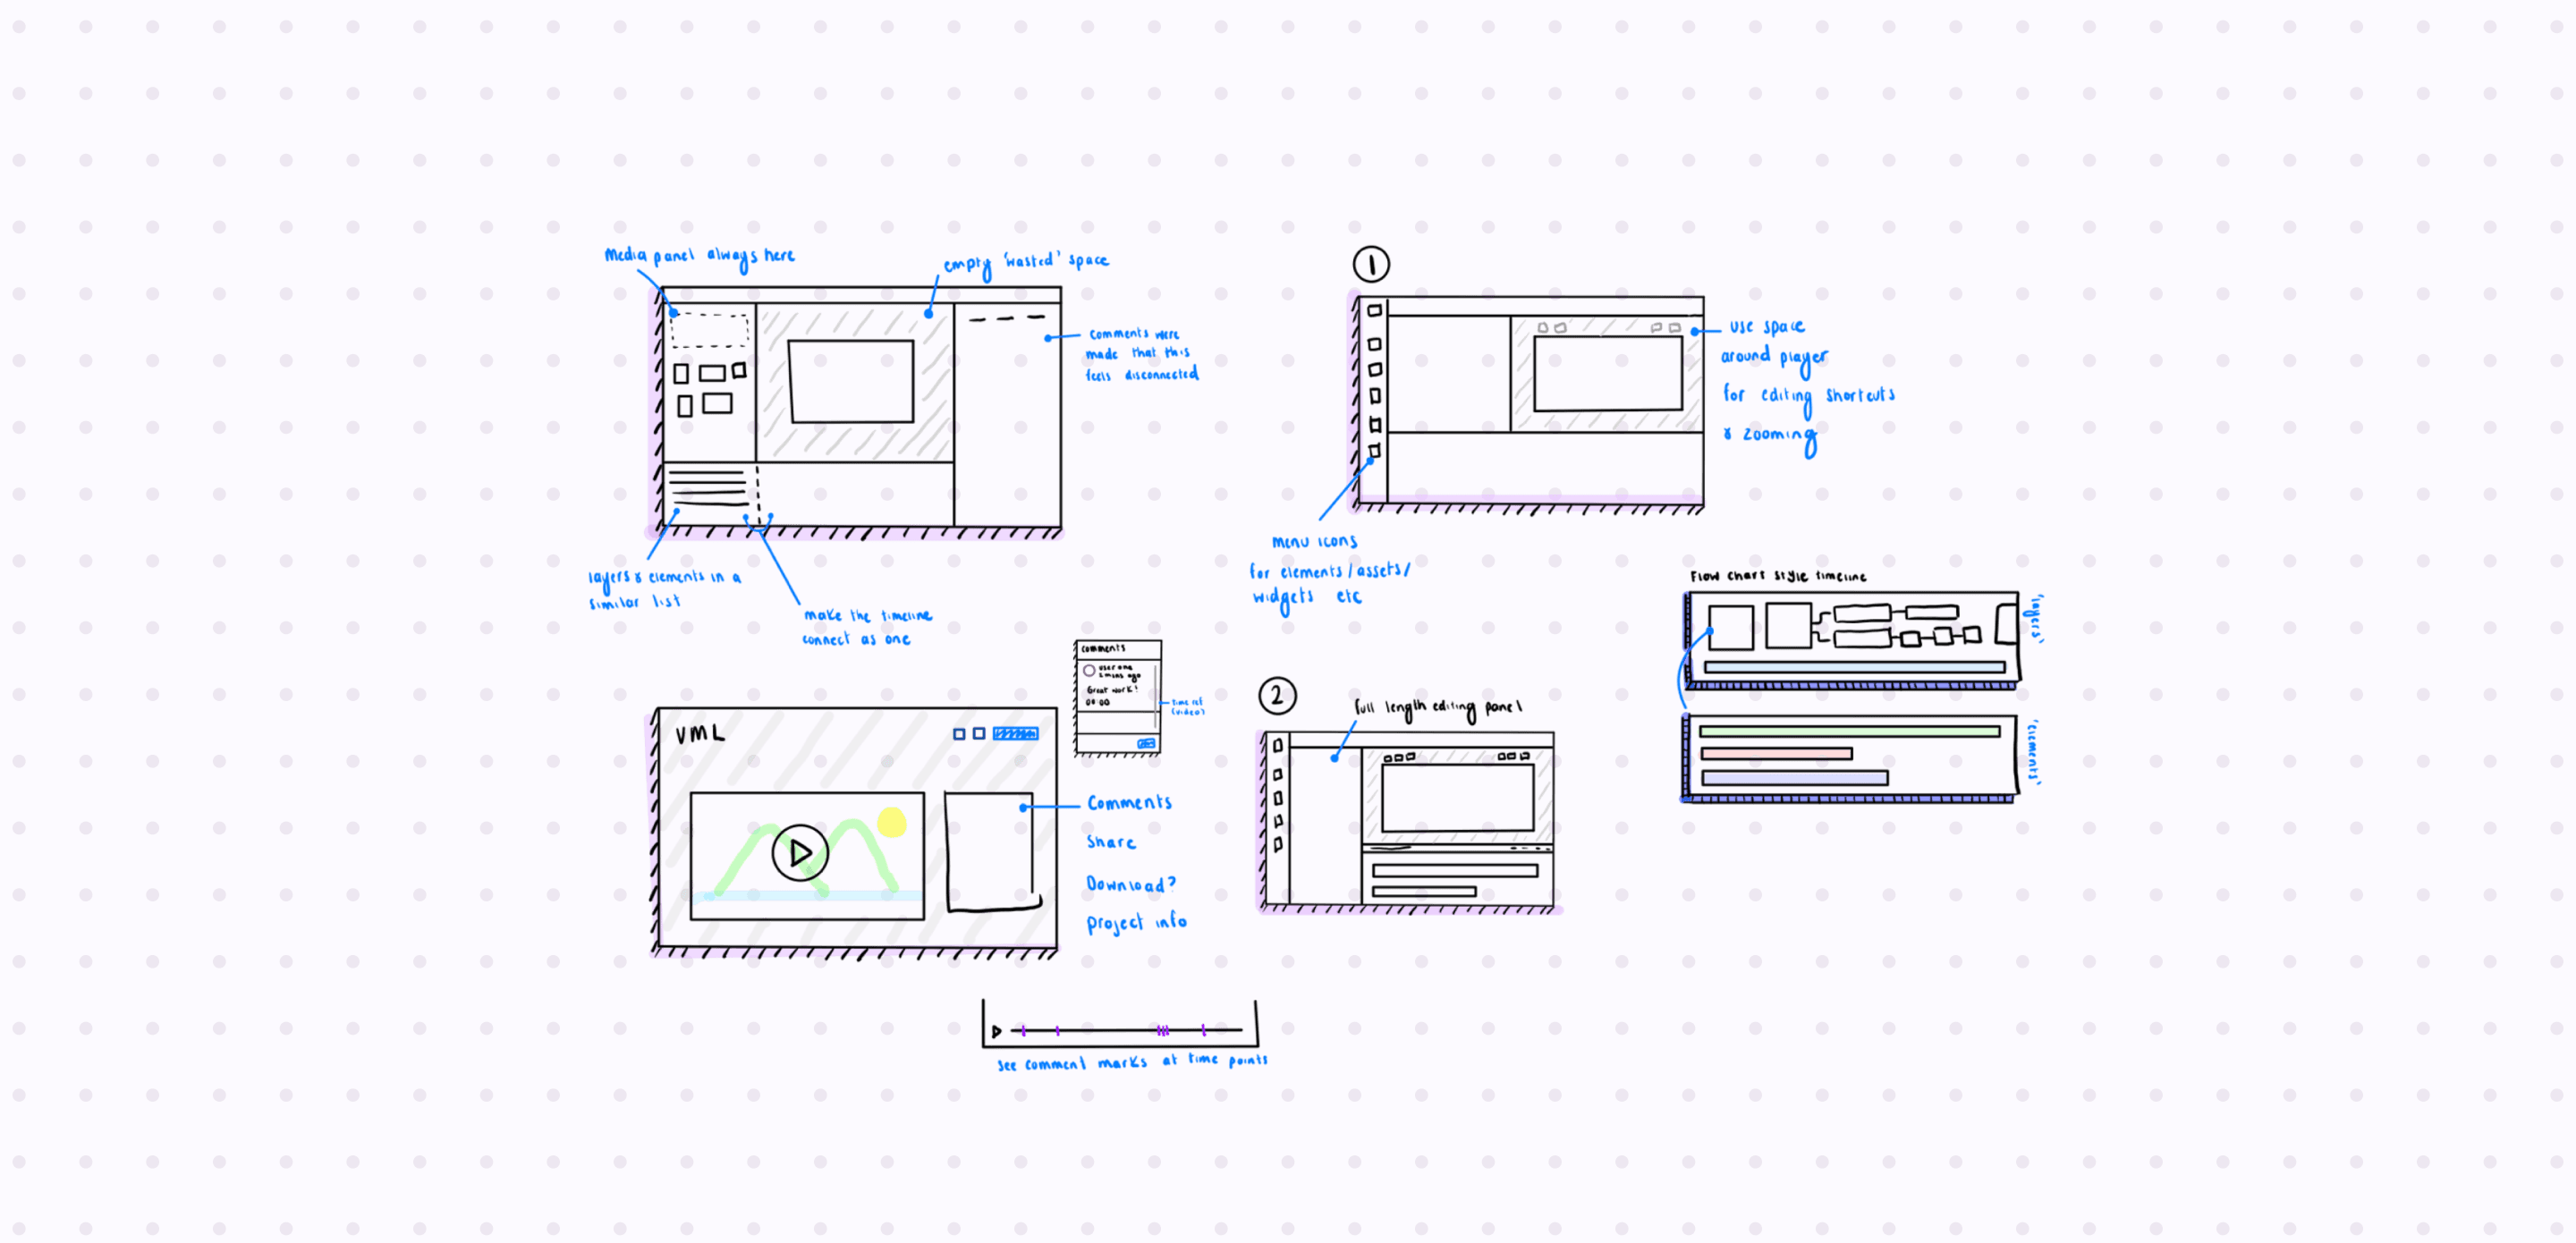
Goodnotes Sketches
We presented our progress on three separate occasions, tailoring each presentation to suit the audience and their specific interests:
1.
Design Review: During a call with developers, we showcased our design concepts and sought feedback on feasibility within the given timeframe.
2.
Sales Team Meeting: We highlighted key insights from user interviews and condensed ideas, considering inputs from developers to inform our decisions.
3.
End of Sprint Demo Call: In a company-wide call, we provided a comprehensive summary of our progress, presenting the refined concepts in a visually appealing format.
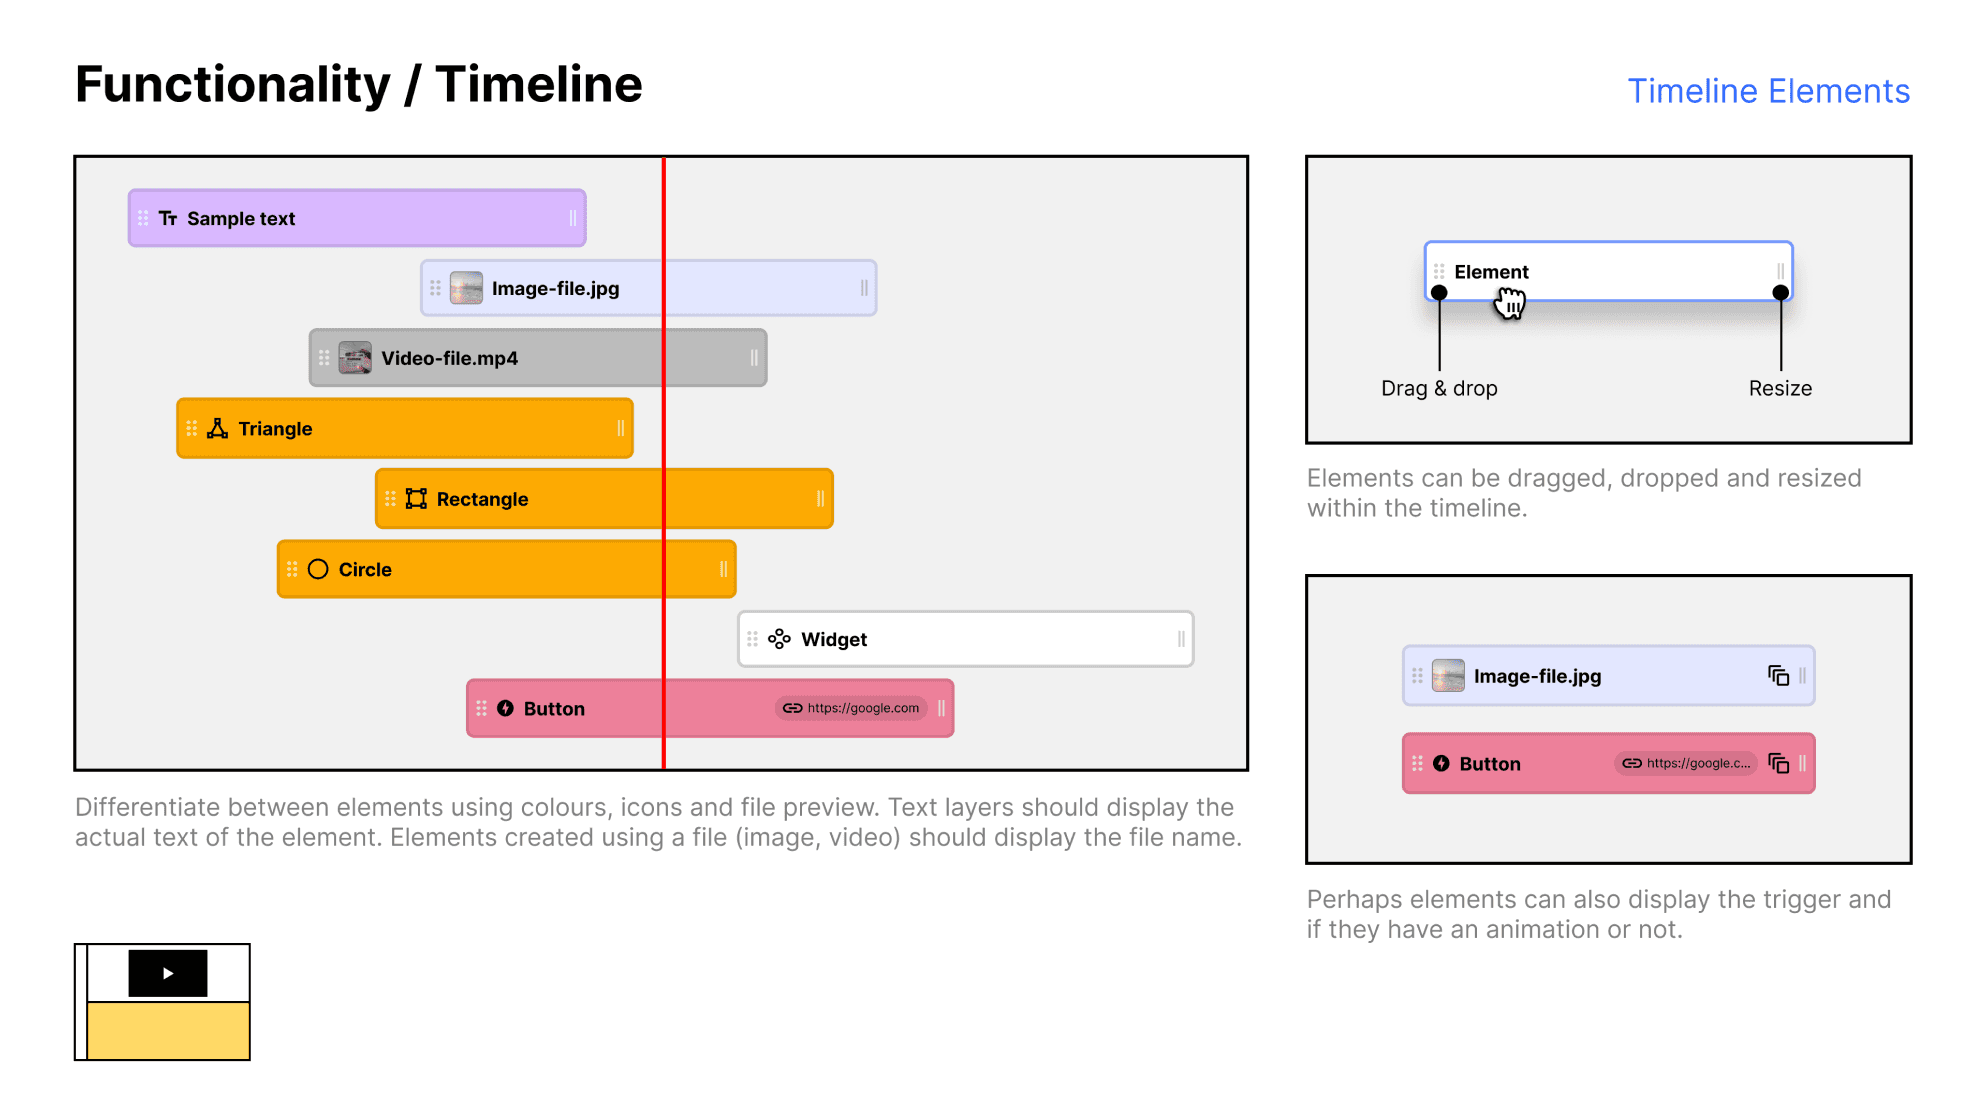

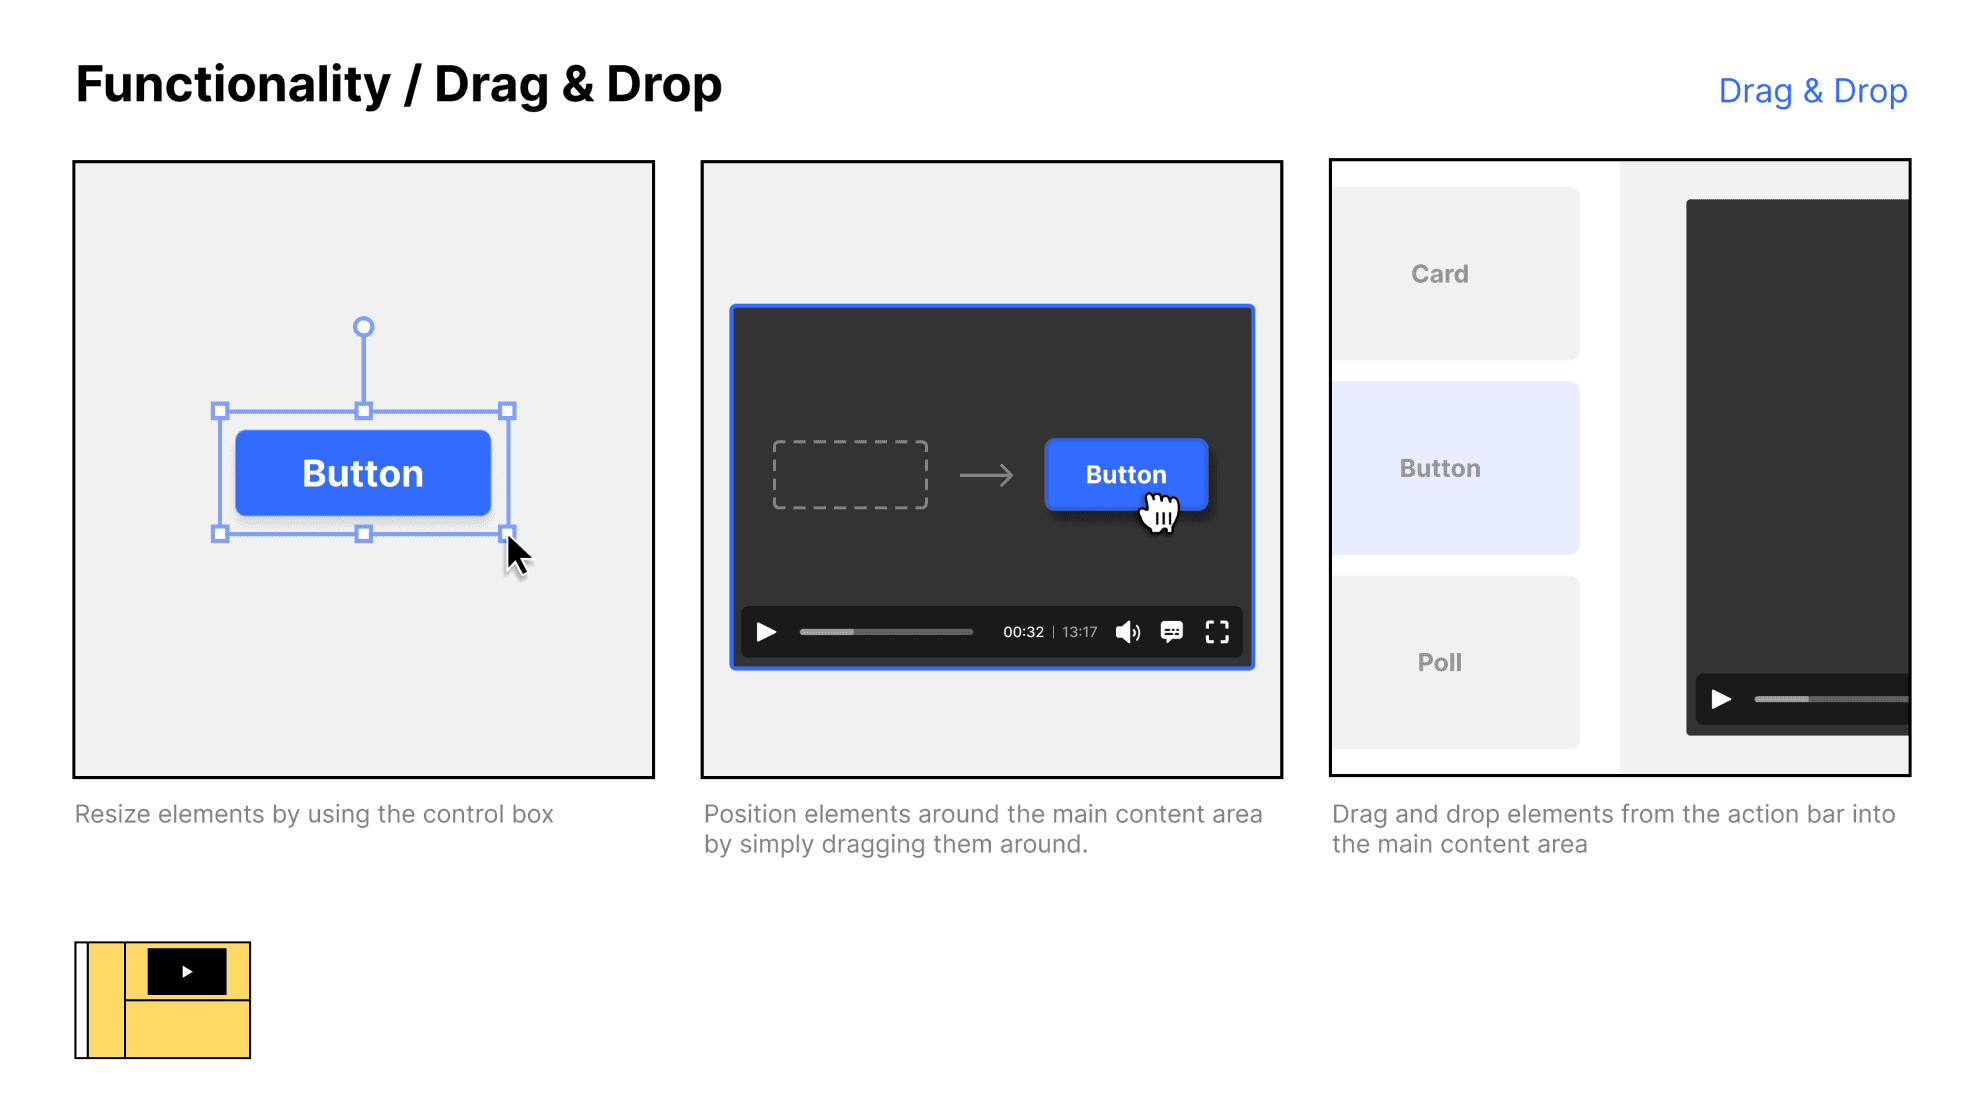


Conceptualising our ideas
Conclusion
To conclude we believed we had enough research and ideas to dramatically enrich the VML Studio experience so any users could jump straight in and experience the power of VML without the need to understand what is going on in the background.
Outcome
Despite the valuable insights gathered during this extensive research, the implementation of certain findings had to be deferred due to resource constraints within the company.
Even though it was disappointing that we couldn’t immediately get to work on implementing our findings, they remain invaluable for future iterations and enhancements.
We understood that it is crucial to focus on the business’s immediate needs so we we had to alter the initially agreed-upon solution to ensure the product's delivery in a working state to showcase to investors.
We had extensive discussions to identify trade-offs for features, ultimately deciding to phase out implementation in two steps: ‘R1 Alpha’ followed by the full ‘R1’ product.
The design team began working on two versions of the final designs simultaneously: a blue-sky feature-rich version reflecting our original findings and a stripped-back version aligned with the immediate needs. This approach enabled developers to understand the long-term vision while ensuring that the product was functional and aligned with investor expectations in the short term.

aynsley longridge
Please don't hesitate to get in touch!

aynsley longridge
Please don't hesitate to get in touch!

aynsley longridge
Please don't hesitate to get in touch!


